Finding the Right Digital Camera
The overall goal of the Imaging Resource website (www.imaging-resource.com) is to help people chose and use digital imaging technology as effectively as possible. As simple as they are to use, choosing the right digital camera involves a number of decisions. Key issues are computing platform, image quality, onboard image capacity, exposure versatility, feature set, and included software. In this article, we'll lead you step-by-step through some of the issues to consider in making a purchase decision, and at the same time, suggest some things to look for in the test images we've collected on our website.
We're interested in your feedback and experience! We invite you to elaborate on this article by leaving comments via the database link at the bottom of the page. You can also give feedback in our "Forum" discussion-group section.
Computing Platform
This is an obvious consideration but it is fast becoming less of an issue than it once was. Most current cameras can be interfaced with both Mac and Windows platforms, although some include more software for one platform than the other, and a few work on only one platform. (If a camera only works on only one platform, it's more likely to be Windows.)
Image Quality
Image quality is a complex subject that includes exposure accuracy, color purity, optics, and image compression techniques. We'll cover this whole area in greater detail later. For now, the important thing to remember is that there's really no substitute for direct experience. Look at the sample images on the Imaging Resource Comparometer (TM) website (http://www.imaging-resource.com/IMCOMP/COMPS01.HTM), paying particular attention to images that represent your expected usage. You may be surprised by the differences between cameras!
Onboard Image Capacity
Depending on your application, the amount of onboard image storage could be pretty important. There is generally a tradeoff between image capacity and image quality, so don't get too excited about high image capacity until you compare the amount of storage in relation to image resolution. One camera may promise to store twice as many images as a competing model, yet have no more actual storage space. The consequence would likely be a loss of image quality. Onboard camera memory may range from 2 to 8MB, while image storage capacity can vary from 10 to 100+ images.
Reusable Memory Cards
Many cameras allow you to make your own decision about the memory/cost tradeoff by allowing you to store images on plug-in cards. This approach allows users to add as much or as little memory to the camera as they feel they need. Once upon a time, most cameras used a single type of memory card (the so-called linear PCMCIA), but those days are long past. Today, there's a plethora of memory types in use, although the market seems to be settling down to a choice of either CompactFlash or SmartMedia. (Look for an article on removable memory to appear soon on the Imaging Resource website.)
Exposure Versatility
One notable disadvantage of digital cameras is their inability to handle radically different lighting conditions. With film cameras, you can compensate for different lighting situations by using different types of film. With a digital camera, the camera's image sensor acts as the film, and it is not interchangeable. So you'll want to be sure that the camera's exposure system (shutter speed, variable lens opening, supplementary flash, etc.) has enough flexibility to handle a wide range of shooting conditions.
The first step in evaluating a digicam's exposure system is to look at its "equivalent ISO number," which is a measure of how sensitive the camera's sensor is to light. A higher number means the camera can successfully capture images with less light. Most digital point-and-shoot (DPS) cameras have equivalent ISO ratings in the 80-200 range, although some go well beyond these limits. In addition to the ISO rating, look for a wide range of shutter speeds and lens apertures. Typical numbers for shutter speeds are from 1/1,000 to 1/30 second, and for lens openings from f/2.8 to f/16. (Although the present generation of cameras has shutter speeds ranging from 1/2 to 1/10,000 of a second!) The wider the range spanned by these two sets of numbers the better.
Flash Capability
Also look for the availability and capabilities of a built-in flash. Key factors here are the range over which the flash will be useful, and the number of "modes" it has. First-generation digital cameras had fairly limited flash power, evidenced by maximum working distances of 10 feet or less, but many current models now reach 16 feet or more. Flash modes refer to different ways the camera's light sensors can control the flash circuitry. In the most basic mode, the camera "stops down" (closes) its lens aperture and runs the flash at full power, so most of the light hitting the subject is provided by the flash. Some cameras offer a "fill" mode for their flashes. In this mode, the camera sets the shutter speed and lens opening based on the amount of light coming from the scene overall. In "fill" mode, only enough flash illumination is used to "fill in" the shadows and bring the illumination up to the minimum required. The result is often a more natural, evenly lit subject. Many cameras also offer special "red-eye reduction" flash modes, in which the flash blinks one or more times before the actual exposure, to reduce the size of the subjects' pupils and minimize the internal reflection that produces red-eye.
The Feature Set
Besides the basic parameters listed above, you'll find a variety of features on the cameras that may have varying degrees of usefulness in your application.
Camera Lens
Many DPS cameras have a "fixed-focus" lens, in which the focal point is set so that everything from about 4 feet out is in focus. This is handy if you need to photograph subjects in that range, but pretty useless if you have to take a picture of something only a few inches wide. Some DPS units have optional attachments to improve their close-up performance, while others offer special "macro" focusing modes that let you get much closer to the subject than a standard lens would. (Look at the macro test shots on the Comparometer (TM) site to find out how well various cameras do in this regard.)
Wide-angle photography is another important capability. It can be particularly useful for indoor family activities, where shooting conditions may be cramped, or for real estate or insurance photography. Again, some cameras have aftermarket accessories available to expand their field of view, so you will want to take this into account when making your purchase decision.
Many digital cameras feature zoom lenses, with a range of focal lengths running from a mild wide-angle (roughly equivalent to a 35mm lens on a 35mm camera) to a mild telephoto (slightly more than the equivalent of a 100mm lens on a 35mm camera). While you invariably pay more for a camera with zoom capability, we've found the feature very useful in real-life shooting situations, and well worth the investment.
Self-Timer
A self-timer is simply a shutter delay that allows you to trigger the camera, then run around to be included in the picture before the shutter snaps. It can also help reduce camera shake when the camera is mounted on a tripod or other solid surface. Pressing the shutter button causes a certain degree of vibration, and using the self-timer gives the camera enough time to stop vibrating before the shutter is released. This feature is an easy addition from the standpoint of the technology required, but often omitted. If you plan to be part of any group photos, or plan to take a lot of low-light scenes, see that your camera has this feature!
Battery Life
You'll find a wide variation between cameras in how long their batteries last. Unfortunately, it's difficult to consistently measure power drain for DPS cameras, though Imaging Resource does report power usage in various operating modes as part of its digital camera reviews. Some manufacturers specify expected battery life and others don't, but you should be wary of manufacturers claims for battery life, as they are sometimes overstated, or may be specified with costly battery types (such as lithium cells).
Another important question to ask about a potential digicam purchase is whether the camera can run off rechargeable batteries. If you plan to take a lot of pictures, the ability to use rechargeable cells could save a lot of money in the long run. (Note that the mere presence of an external power adapter may not mean the camera can use rechargeables, and probably does not mean the unit will recharge batteries while it is plugged in.)
External "booster" battery packs are available for some cameras, increasing their working time in the field many fold. Keep this in mind if you plan to spend long periods on the road, far from power outlets. If a "booster" pack isn't offered, make sure you change or replace batteries in the field.
External Power Adapter
While we're talking about power, how about an external power adapter? You'll find DPS cameras generally consume much more power while communicating with the computer via their serial ports. If you have an option to run from a power adapter while downloading images, your batteries will last a lot longer. It's important to note here though, to be certain to use the correct power adapter with you camera, as the wrong one could easily fry a $1,000 investment!
Included Software
The software included with a camera can be pretty important. In fact, this is an area where you'll find some of the greatest variation between cameras. In the Imaging Resource digicam reviews, we try to give readers some idea of how the different units fare in this respect. Here is an overview of the most critical software needs:
Image Download
One of the most important functions to consider when reviewing digital camera software is how convenient it is to unload images from the camera. Can an entire camera-full of images be pulled onto your hard drive quickly for later processing? Or, is the camera held captive while each image is individually processed? Alternatively, can "thumbnail" images be viewed prior to downloading the full-size files? This can save a lot of time in culling the few best shots from a large group.
Image Manipulation
Getting the images into the computer is just the beginning. Does the included software allow you to manipulate the images after you've captured them? How easily can you compensate for poor exposures, color casts, or misaligned images? How about minor retouching to remove blemishes, errant reflections, or red-eyes? Most digital camera packaging includes a list of accompanying software, or you can find the information within the Imaging Resource reviews or on the camera manufacturer's website. We suggest you review the capabilities of the software so you know exactly what you'll be able to do with your images once you have them on your computer.
File Formats
File format is the form in which your images are stored in the camera's internal or external memory. Standard still image formats include uncompressed TIFF and compressed JPEG files in RGB (red-green-blue) color mode, plus a number of other formats, such as GIF, EXIF, and MPEG (for movies). File format is critical to the software's file-export capability, and to your intended usage. Your requirements may be different if you plan to capture images for multimedia presentations rather than printed output. Most camera software is fairly competent in providing images in the standard file formats, with some manufacturers increasing their present levels of capability. Virtually all packages provide for export of RGB TIFF or JPEG files, which are supported by most document layout and word-processing applications, but if you need formats beyond the standard TIFF or JPEG formats, you'll have to look into what the camera software supports more carefully.
Cataloging
One of the first things you'll learn once you start using a digital camera is how fast images pile up! (If you haven't already, you'll doubtless find yourself buying a much larger hard drive.) Having adequate storage space is only half the battle though; finding images is another matter entirely! In recognition of this fact, some cameras include at least rudimentary image cataloging capability in their software packages. On the Mac, just the ability to create a "thumbnail" preview to display as the file icon is a big plus. (A word of warning: Hundreds of file icons with thumbnail images attached can really slow down access to folders on your hard drive. Turning off the "preview" option and using a cataloging program instead can really help system performance.)
Some manufacturer-supplied camera software includes rudimentary cataloging capability, but in our experience, none of these packages offer the level of capability you'd need to manage more than a few dozen files. Accordingly, if you need to track large numbers of images, you should really look at one of the many image database programs on the market. Some manufacturers have begun to bundle more powerful third-party image cataloging products with their cameras -- a very welcome addition.
Links to External Applications
One of the nicest characteristics of "desktop" applications is how easily you can move data or design elements from one application to another. The Macintosh has excelled in this respect for years, and the Windows platform made rapid strides beginning with Windows 95. There are varying degrees of integration available, however. Some software requires you to save a file to disk in one application before it can be imported into another. Other packages let you place an element from one application directly into a document of another. Sometimes, you can simply "drag and drop" an image from the camera software into a page layout program. Look at the camera software with your specific application in mind, and see what's required to move the images from the camera to the programs where you'll ultimately be using them.
Image Quality
Image quality is one of the most important characteristics to consider in choosing a camera, and is impossible to evaluate from manufacturers' spec sheets. Ultimately, the only way to tell if a given camera will produce acceptable results in your intended application is to compare photos taken by various cameras of similar subjects, and to test them in each of the shooting conditions you expect to encounter. (This underscores the importance of the test images provided on the Imaging Resource website: http://www.imaging-resource.com/IMCOMP/COMPS01.HTM.)
The reason image quality is so hard to get a handle on is twofold. First, there is currently no standard, objective scale by which to measure color accuracy in digital cameras. Second, all DPS devices use image compression technology to cram images into their limited memory. Depending on the algorithm used and the amount of compression applied, image quality can vary widely, even between devices using the same CCD sensor! So, let's look at some of the elements that contribute to image quality:
Color quality
Color quality is a complex and generally misunderstood topic. While it is probably less an issue for typical point-and-shoot applications than for high-end studio cameras, the large differences we've found between cameras suggests that a detailed discussion of color quality would be useful to any consumer who is investigating digital cameras.
Color quality is actually made up of two related, but different, parameters -- color purity and tonal balance. People tend to assume color errors can be corrected easily in an image-editing program such as Photoshop, and therefore tend to discount their importance. This is generally true of tonal errors, but errors due to color purity are virtually impossible to fix.
Gray Balance & Color Accuracy (Tonal Errors)
As mentioned above, tonal errors are fairly easily compensated for in a digital image, often with very gratifying results. Of these, gray balance is both the most dramatic and the most easily corrected. While a full treatment of gray balance is beyond this particular discussion, we can nonetheless cover a few key points, and see the effect that relatively simple adjustments can have on an image.
 As the name suggests, gray balance refers to bringing gray tones in an image into neutral color balance. This is done by balancing the individual red, green, and blue channels across the entire tonal range. Of course, if the digital camera's blue channel responds more than the red or green channels, the pictures would have an overall blue cast. While gray-balance problems are sometimes as simple as this, generally they are more complex.
When reviewing the color accuracy of a digital camera, it is important to pay attention to the colors across the entire range of tonality, which means you must look at gray balance in the shadows, the highlights and all points in between. In practice, it is neither practical nor necessary to make gray-balance adjustments at each step across the whole tonal range. Usually, adjusting the balance in the highlights, shadows, and midtones brings dramatic results with relatively little effort.
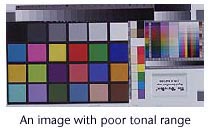
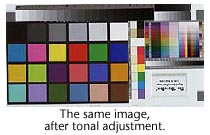 In Photoshop, these adjustments can be made with the Image/ Adjust/ Levels function, and correction curves can be saved for fairly automated application to groups of images captured with similar lighting. The color charts above and at right show sample results. The image above is "as captured" by one of the cameras we've tested. The image on the right is derived from the same file, but has had a rudimentary gray-balance adjustment performed on it. Note how much "cleaner" and brighter the colors are, almost as if a layer of grime had been wiped from the image.
While gray-balance adjustments can produce a dramatic improvement in color quality, they are by no means a panacea. Proper gray balance can substantially brighten colors, but it will not correct color impurities resulting from poor-quality color filters. You also need to keep in mind that time spent adjusting gray balance is time lost to more productive work. A camera that looks like a bargain may prove otherwise if you have to spend 20 minutes color-correcting every image it produces.
Evaluating Color Purity & Accuracy
Important as it is, color accuracy is a slippery parameter to quantify. Rather than trying for some sort of absolute standard for color accuracy (which would likely be difficult to interpret anyway), Imaging Resource has opted to provide consistently exposed test images that would help you make your own subjective evaluations. The "Dave Box" target includes a Macbeth color chart, which is a well-established and reasonably consistent color reference that is readily available at most camera stores.
Dynamic Range
Dynamic range measures how wide a range of subject luminance (e.g., brightness) a sensor can accurately reproduce. Most digital cameras can capture a wider range of brightness values than the printed page can reproduce. The key issue is how good a job the hardware and software does of compressing the full range of scene brightness into a range that output devices can reproduce. This capability, whether in a camera or a high-end scanner, is called tonal compression, and it is an important characteristic of high-quality input devices.
Tonal compression is as much an art as a science, and different devices use different input-to-output curves to accomplish it. Generally, you want to avoid losing either the highlights or the shadows, yet still maintain reasonable contrast in the midtones. Visually, photographers are accustomed to looking for tonal problems in very light and very dark subjects. Traditionally, people shoot white porcelain objects to study subtle highlight detail and dark camera bodies or electronic equipment to look at shadow detail. This is a valid approach, but subtle differences are often difficult to detect on the final printed output. On screen, without an assist from Photoshop or some other image-editing program, the problem is even greater. Especially in the shadow areas, the tonal response of CRTs is very poor.
The way to really see what's going on is to use the Photoshop Levels control (or the brightness/contrast adjustments in consumer-grade imaging programs) to stretch the tonal range of the image in the areas you're interested in. For highlights, this is accomplished by moving the black-point slider well up into the midtones. This forces everything darker than the midtones on down to black, stretching the remaining tones over a wider range and emphasizing tonal differences in the brighter portions of the image. For shadow areas, reverse the procedure, moving the white-point slider down into the midtones. This forces everything from the midtones on up to white to go all the way to white, stretching the shadow tones across the full range and emphasizing subtle tonal differences there as well.
The pictures below show this process applied to an image with deep shadow detail. In the first we see the original image, and the display from a Photoshop Levels adjustment window. Note that all of the image data is clumped on the far left, in the deep shadow. In the image itself, there's no apparent detail to be seen. In the next frame, we've moved the highlight slider far to the left until it's just touching the right-hand edge of the histogram "lump." See how this brightens the screen display, pulling up detail where none was to be seen. Finally, the last panel shows how the brightness levels of the image have been "stretched" to cover the full tonal range. The image is the same as in the middle panel; the change has just been made permanent in the file. Note that if the gray balance of the camera was inaccurate, these procedures would also show color casts in either the highlights or the shadows that wouldn't be obvious to the unaided eye. (In other words, don't be surprised if your shadows end up looking yellow or red after you've tinkered with them to this extent.)
Finding "hidden" images in deep shadows
| The starting point: There's a range of tone there, but all clumped at the extreme shadow end of the range. |  |  |
| By moving the "highlight" slider down to lightest tone on the graph, we see the hiddin detail. |  | 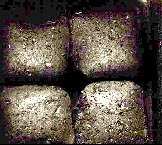 |
| When the operation is complete, the available brightness values are spread across the full range of the display. |  | |
What do you look for in evaluating a camera's tonal range? Whether in the highlights or shadows, you want a camera to reproduce tonal variations smoothly, without obvious "tonal breaks," "posterizing," or "quantization" (three different terms all meaning the same thing). The most common defects occur when highlights wash out to white or shadows plug up, going black in regions where there is still some tonal variation in the subject that you'd like to retain. These faults are sometimes hard to see, but Photoshop will smoke them out every time.
For the DPS cameras, the "deep shadow" test of charcoal briquettes in a black box was almost too severe a challenge. Most of the devices we've tested could only just barely discern the presence of the briquettes, let alone show any significant detail. Nonetheless, you'll find clear differences in performance if you play with the camera files in an image-manipulation program.
Camera Limitations
In discussing techniques for finding camera limitations that aren't visible to the naked eye, a natural question is, "Who cares?" After all, if you can't see it, why worry? The answer is that sooner or later, you'll need to "push" an image in some way, perhaps to open up the shadows, boost midtone contrast, or hold back the highlights a little. When you do this, any tonal imperfections will be magnified, along with whatever detail you're trying to bring out. If you've never shot a photo that wasn't perfectly exposed, then congratulations, and just skip this entire section. If you're subject to the same slings and arrows as the rest of us mortals, though, you owe it to yourself to look carefully at what a digital camera will do before you invest your hard-earned money.
Sensor Noise
 The characteristic that most limits the overall tonal range of a digital camera is noise in the sensor array. Without getting overly technical, a noisy sensor means you'll see "grain" or "snow" in solid grays or colors. This effect is particularly pronounced in shadow areas. If you download and play with images from the Imaging Resource site, you can use the procedure described earlier to boost the shadows into an easily visible range. The darker steps of the Kodak gray scale will give you the most consistent reference to work with, but for subjective evaluation, the charcoal briquettes in the black box are perhaps the most useful. Sensor noise usually appears as "snow" in the image, much as you would see on a television set experiencing poor reception. Depending on the construction of the camera system, the noise may appear as randomly distributed monochrome or colored flecks. (Certain sensor irregularities may result in some patterning to the noise flecks, but usually the distribution will be fairly random.)
If you performed the earlier experiment, you're likely to have had a good look at sensor noise while looking at shadow detail. In the process of pulling the shadow tones up into the visible range, you would have also greatly increased the visible effect of any sensor noise that might have been present. The illustration below shows a shadow detail sample from a studio camera with high noise and a marked color cast in the deep shadows. In DPS cameras, noise effects are largely masked by the JPEG image-compression process. Noise is nonetheless a primary limitation, even if we don't see the effects directly.
Sensor & Optical Artifacts
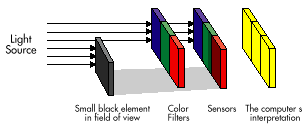
As we discussed earlier, each image captured by a digital camera is actually three separate images (red, green, and blue). In order for your picture to look right, all three of these images must be kept in perfect registration. If the registration between the tricolor images is off at any point, the result will be a color "artifact." (Artifact here is just another word for something in the image that came from the camera, rather than from the scene.) In practice, most DPS cameras use "striped arrays," so the color registration is both fixed, and inherently offset. This gives rise to a particular type of color artifact.
Striped Sensor Arrays
 Ideally, a digital camera would arrange to have separate red-, green- and blue-sensitive sensor elements staring at each pixel-size area of the scene. In most cases, this is prohibitively expensive, even for high-end studio cameras. A popular, low-cost way of approximating this capability in a digital camera is to "stripe" the sensor array with microscopic color filters. The result, as shown here, is generally an array of RGB color triplets, much as you can see if you look closely at a color TV picture tube (or computer display CRT) when it is operating. This approach trades off resolution for single-shot capture capability, but carries with it other penalties as well.
Array Striping Artifacts
 The most significant limitation of striped sensor arrays is that they are prone to generating color moirés and other artifacts when viewing small, high-contrast objects. (This situation frequently arises in product photography, where fine black type on labels can cause problems.) In the Davebox images posted on the Imaging Resource website, you may be able to see such artifacts around type, or as a colored moiré on the resolution target with the repeating patterns of vertical lines. In print applications, as long as the file isn't magnified too much, these artifacts are somewhat hidden by the half-tone printing process. If the image is magnified at all, though, these artifacts can be quite evident. In multimedia applications, these effects are almost always visible.
In the resolution test images appearing on the Imaging Resource website, you'll find several places where closely spaced parallel black-and-white lines produce color artifacts when photographed by various cameras. These false colors are caused by an interference pattern between the spacing of the lines in the test target and the spacing of the red-green-blue filters on the surface of each camera's imaging array. Differences in compression techniques and optical systems between cameras make them more or less prone to producing such artifacts. While this pattern represents a particularly severe test, a camera that has trouble with it is also likely to have problems with things like venetian blinds, etc.
Overexposure "Blooming"
A final limitation of CCD sensors is their reaction to severe illumination
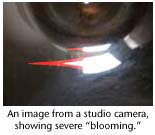 overloads. This is the reason for including a shiny pot lid in the Dave Box targets on the Imaging Resource website, because it reflects light sources back into the camera lens. In the face of extremely high light overloads, some CCDs will "leak" charge from the overexposed elements into adjacent cells. This phenomenon is called blooming, and various methods are employed to prevent it. It most frequently shows itself as a colored fringe around specular (shiny) highlights. Frequently, the sensor will bloom differently in each of the red, green or blue channels, producing the colored fringes where one channel has bloomed more than the others. The impact of this for your particular work will depend on its nature. If you intend to photograph a lot of chromed auto parts, blooming could be a big problem. On the other hand, it would be a complete non-issue in photos of bath towels.
Resolution(!)
 Resolution is one of the most misunderstood, misrepresented, and confusing parameters in the entire field of digital photography. It is also one of the hardest characteristics to specify in a precise, objective manner, particularly for the digital point-and-shoot cameras. One of the most important things to understand about resolution in digital cameras is that pixels are not resolution! ALL of the entry level point-and-shoot cameras use large amounts of image compression to squeeze a reasonable number of images into their limited memory. The complexity and variety of these compression schemes makes it nearly impossible to arrive at any meaningful correlation of pixel count with the camera's ability to resolve detail. Once again, it's really important to look at test images to determine how each camera actually performs.
It was to resolve just this conundrum that the "WG-18" resolution test target was developed by an international committee of imaging scientists. It contains a multitude of test patterns designed to reveal exactly how well a given camera can resolve fine detail. A full treatment of the target is well beyond the scope of this article, but even the uninitiated can look at images of it taken with two different cameras and rapidly ascertain how well or how poorly they perform in relation to each other. As always, let your own eyes be the judge, and use the Comparometer™ to perform your own side-by-side comparisons.
Image Compression
At first glance image compression looks like magic. In fact, at second glance, it's pretty easy to convince yourself it is magic! How else would you describe a technology that can cram sixteen 1MB (megabyte) images into a single megabyte of storage space? Of course, nothing comes for free, not even with the spiffiest of high technology. So, while you can get away with pretty substantial amounts of image compression without people noticing, the level used in many DPS cameras is well beyond that point, and different devices succeed to varying degrees, depending on the details of their particular compression techniques. (Although, as memory has become cheaper, manufacturers are finding it to their advantage to trade more memory usage for less compression and therefore better picture quality.)
The key to usable image compression is to throw away "unimportant" information in the images, and to take advantage of local areas of similarity within each image. For instance, you don't need 24 bits of information to tell you what color a particular piece of an image is, if it happens to be about the same as the pieces on either side of it: Just record the differences! If the differences are small, the information you'll need to store will be small as well. Also, the eye tends to be much more sensitive to certain kinds of detail in an image than to others. If we can find a way to throw out only the detail our eyes aren't very sensitive to, we can reduce the size of the file without our eyes noticing what we've done.
This is the essence of all image compression schemes, but as you may suspect, the concept is easier to describe than to implement. While standard techniques exist, there is a lot of latitude as to how manufacturers can tweak them to produce the best results for their particular camera. Recent advances in compression technology go beyond standard techniques, and some manufacturers have taken advantage of them to capture finer detail with little increase in memory usage.
When looking at sample images on the Imaging Resource website, the effects of image compression generally can be seen as a "blockiness" in areas of fine detail and high contrast. Look around the edges of objects that contrast strongly with their backgrounds. You'll see errors introduced by the compression process in the form of square blotches at the corners, and "stairstepping" down diagonal edges. Note too, that it is important to look at areas with much "flatter" contrast as well. Sometimes, manufacturers tweak the compression methods in ways that throw out too much information in areas with subtle contrast differences. These cameras tend to lose the shading and reduce even toned areas to blocky chunks of flat color.
Digital Point & Shoots: Today into Tomorrow
Digital point-and-shoot cameras have made dramatic strides in a very short period. Since early 1998, the higher-end units have been rapidly approaching parity in image quality with conventional film-based point-and-shoot cameras. As this trend continues, the day of "filmless" photography will truly arrive.
Article by Dave Etchells
Thank you very much for very useful tips!
